High-Poly Statues

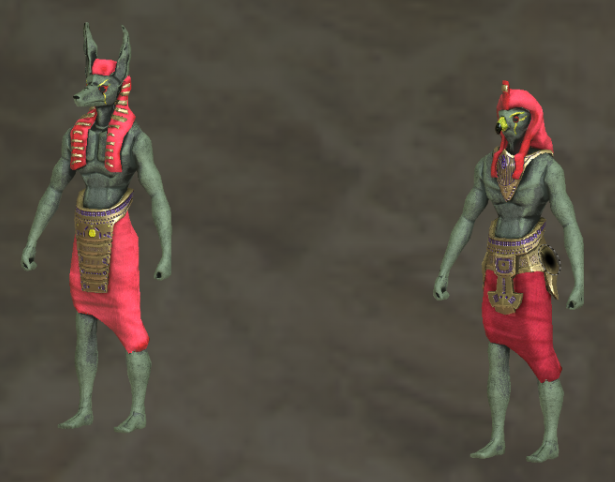
As previously mentioned in this blog, I worked on creating statues for the gods in the game. When I last wrote a post about this I was almost finished with the low-poly for Anubis. I shortly after that started to work on Horus. To make life easier for everybody we decided to reuse Anubis body and replacing the head. This worked quite well and I only had to make some small alterations to Horus’s body.

When it was time for me to do the high-polys I had to decide what to put in the high-poly and what to put in the textures. Seeing as I was not the one that was going to texture them I had a discussion with the artist that was in charge of the textures. We decided to put as much as possible in the high-poly. I started with Anubis and began with the body. I went for really exaggerated chest muscles but leaving out most of the abs. The reason for this being that 3Ds Max is not that good of a software to work with organic high-polys, so it would take unnecessary time for a result that could be achieved by using a heightmap in the texture. The optimal thing to do would be to use a sculpting software such as Zbrush. I have never worked in Zbrush and we did not have time for me to learn a new software. So that is why we went for a height mapped texture instead. I also did some work on the ears and the belt.

When it was time for Horus I reused Anubis high-poly for the body. I then began to work on the head, and focused a lot on creating eyes for him. When it came to the skirt I had to differ a bit from the concept art. The skirt was supposed to have feathers all over. However, making them would take up a lot of time that we do not have so we decided to skip them completely.


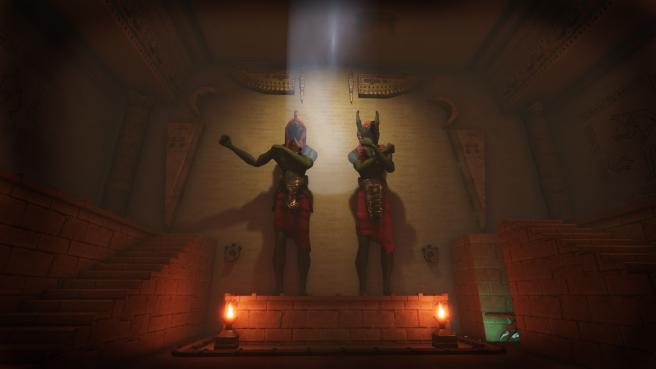
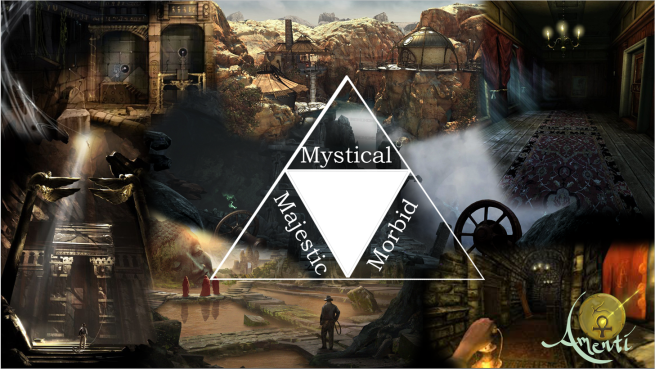
Beneath here you can see the entire process from concept to final in game product. The artist behind the textures is Gustav Larsson.


Screenshot_6

questions

Writing a pitch

As the producer one of my responsibilities is to write the pitch for Gotland Game Conference. Each game that is participating in GGC gets five minutes to pitch their game in front of the jurors.

The pitch for Amenti has gone through many iterations, starting off in early December when we first came up with the idea and started to put it through the pitching process to get greenlighted for BGP.
I have reused some of that material, but I have rewritten most of it due to the fact that the game has changed a lot since the original idea. I have also looked in to my pitch for Trust, the game that I was producer for during Theme Park last year. The pitch for Trust was nominated in the Best Pitch category last year, and is therefore something that me and my team are very proud of and something that we want to take as much inspiration from as possible. However, Trust is a very different type of game then Amenti. Trust is a game about hugs. It is two player game where you play as two children whom are lost in the woods. The input are two backpacks with two buttons each. When things get to scary for the children they have to hug and so must the players. That allowed me to build a pitch around a feeling and set the mood with some music that our lead sound composed. There was no need for a trailer in that pitch and that is something that I am very proud of and we attempted to redo it.

However, due to the two games differences, Amenti did not hold up the same way with just music. In Trust, I sold a concept more than a game. But Amenti is a very visual puzzle game and therefore it needs a trailer to do it justice. I also decided to go for a very visual presentation with as few words in the slides as possible. So after many iterations and pitch practices this is the disposition I decided to go with:

Slide 1: Introduction and the backstory for the game world

Slide 2: Backstory for the character

Slide 3: Trailer

Slide 4: Description of gameplay

Slide 5: Inspiration

Slide 6: Target Audience

Slide 7: Future Potential

Slide 8: Questions

The pitch now takes exactly 5 minutes. So I must make sure to talk at the right pace so that I do not go over the time limit.

Here is a preview of some of the slides.

backstoryta

That is it for today!

Week three and four

Hi again!

Since my last post, I have done several things. It was Easter during the third week so we took Friday off to spend time with our families. However, we still managed to do a lot of work. I did some placeholder, modular assets. For example, I made a pillar consisting of six parts, that can be exchanged and moved around to create several different pillars. I also did some arches that can be resized and reused throughout the game.

Screenshot_12

I also did two non-modular 3D assets, a rat and an Anubis statue. The rat is to be used as the object that the player sucks the life-force from in order to give life to statues.  The Anubis statue will be placed inside the hall of statues and it will have one animation for when the player masters the Anubis rooms. And finally, I observed when two of our graphical artists created our animations for the main character with Motion Capture. Both of them has studied Mo-Cap earlier this year and I plan to do the same next year, so I wanted to get a head start.


The fourth week has been quite inefficient due to some technical difficulties and meetings that took away hours that could have been placed on work tasks. I was supposed to build the first two levels with our placeholders in Unreal, but since we could not get the server working on my computer until Friday afternoon, I unfortunately could not do any of this. I have however watched tutorials on how to make complex collision boxes in 3Ds Max and importing them in Unreal. I also checked if some of the placeholders’ size were appropriate in-engine.

During the fourth week I finished the Rat, by making some minor topology changes, as well as rigging and skinning it. The reason I chose to do that this early in production is because our programmers has finished coding the behavior for the rats and needed a skeleton mesh for it to work. As of now the rat does not have any animations yet. I will fix that pre-beta. It was harder than I fought to rig and skin a rat. Up until now I have only rigged and skinned human/humanoid characters and this was a bit different from that. For starters max does not have a specific skeleton for rats, so I had to use one for Lizards and adjust how many bones and segments it should have in order to fit into a low-poly rat. When I started skinning I had some issues figuring out how to best affect the legs, seeing as rats have two knees per leg. Another issue I had was that I could not mirror the skinning information from one side to the other. This led to the skinning taking twice as long as planned.

Screenshot_3 Screenshot_13Screenshot_14Screenshot_15
Here you can see the development from start to finished low-poly mesh and rig.

The Anubis statue will be placed in the hall of statues and lead the players eye towards the Anubis Rooms. I was initially done with the low-poly for the statue during the third week but the art team decide to make some changes to create a more interesting silhouette.

Anubis03Anubis04

Both the Anubis statue and the rat will have high-poly meshes, in which I will ad more details.

That is it for now!

Big Game Project Week 1 & 2

Hi!

The first two weeks of Big Game Project (BGP) has flown by faster than I expected. For this course, me and my team of 7 are developing a game called Amenti.
Amenti is a first person dark, puzzle game where you will bend the elements of the gods to your benefit.  Placed deep inside an Egyptian pyramid in the late 1800s. You play as Sofia Thompson, a young archeologist that’s trapped in the pyramid. She went down there to solve the mystery of her father’s disappearance. However, her curiosity caused her to pick up a cursed ring that turned her left hand into “the hand of death”. Now she must venture down through the pyramid to reach the death realm and find the Ankh, the only thing that can cure her.

My role in this production is first and foremost being the Producer, and second a graphical artist. In my role as Producer it is my responsibility to supervise all the administrative work, hold presentations and meetings, as well as solving conflicts within the group. I have been the Producer in every group since I started this education and I am fairly certain that I want to work with project management once I have finished my education.

So, for the first week of BGP we focused solely on pre-production work. For me this meant writing a pitch with a PowerPoint to present in front of the class and staff. After the pitch, I started to work on our Scrum document and our project plan.  I also supervised the writing of our design document.

The pitch was the easiest part of these two weeks. Before this course, we were given the opportunity to participate in Road to GGC, where we got feedback on our game idea on three separate occasions during the course of four months. I had already written three different presentations for these occasions so I used them as a template.

scrum

The really tricky part has been putting together the Scrum document and the project plan. For those of you who are not familiar with Scrum, it is an agile workflow consisting of several steps. See picture above. You start of by writing a product backlog, in which you write down all the different assets in the game and what they need. Once the backlog is finished you start your sprints. I have scheduled my group so that every Monday we have a sprint plan where we decide what needs to be done that week by each person and plan how much time they will need for each task. We also discuss how large of a risk that task will have. This is mostly based on the person’s knowledge of the task.  We also decide who will be in charge of the quality assurance for each task. Tuesday-Friday we have daily standups where we talk about what we are going to do that day and what we might need help with. Finally, we have our Sprint Review where we follow up on that week’s tasks. We write down how long it took to do each task, if we did any additional tasks, the actual risk, if it is implemented in the engine, if it meets expectations and if it’s completely done.

The reason I struggled with the Scrum document was the backlog. It takes a lot of time to write down all the assets, and seeing as I have no experience with programming I cannot write down the code parts. On top of that, one cannot write down assets before they are properly planned. The entire team was eager to go in to production as soon as possible and skip all the boring parts of pre-production. So, I had to convince them to prioritize this and the design document, which was easier said than done and unfortunately delayed the pre-production. Now however, after a slow start, we are up and running in production.

Once all of the documentation was done I  to spent my Friday morning working on some placeholders.

They are all very low-poly and in their first state. For now we use them to measure size in the world and as tools to white-box out all levels to test the puzzles.

That is all for today, stay tuned!

Death to the birds

Hi guys!

So the last week of production is here, and one of the last things I have worked on is the death animations for the enemies.

My first plan was to do the same animation that my former teammate Daniella did on the owl mom and her owlets.

owl_mom_death_sprite

However, due to her dropping out I could not ask her for help. I think she did the animation by using the lasso tool in Photoshop and dragging small pieces backwards. But this would be quite time consuming and seeing as it was the final week and I had to do the tasks that she left behind, I simply did not have time for it.

I got advice from my scrum master Nicolina, to make it as simple as possible. And reuse the animation for all the birds. So that is exactly what I did.

I figured that the easiest way would be to use the projectile as a start and then blow them up. Not only would it be an easy animation, I also really wanted to blow these birds up because I am so fed up with them. I really had no idea how hard it would be to animate birds.

deathanim_test

Anyways, I started off by doing a simple sketch and then I showed it to my friend Amanda. She then did this animation to give me something better to work from.

amandaexplosion

So basically what I did was to take the projectile, make it slightly bigger for every frame and using the lasso tool and the eraser tool to shatter it.

death1

For each death animation I drew three different feathers to match the bird the death animation was for. Then I moved, scaled and rotated them in perspective in order to make them look as if they were coming closer and exploding outwards.

The last thing I did was to put the bird on a layer behind the projectile for three frames and reducing the opacity for it, in order to make it look as if the bird is slowly being pulled into the explosion.

So here you have the final results!

I am actually really pleased with them, especially the colors. And they look really good in game.

I don’t think that we have to write anymore posts for this course. So I guess that this is goodbye for now. I will so enjoy the blog-free time ahead!

Peace out!

Thunderclouds

Hi guys!

This week has been a hectic one. One of my graphics teammates decided during the weekend, that she would no longer participate in anything that had anything at all to do with this course. This meant that I all of the sudden had twice as much work to do for the final two weeks. And unfortunately the pressure has led to a slight decrease in quality of the things I have produced this week.

This week’s post will be about the asset that as of now, I am most pleased with, the thunderstorm.

So when I started out the only restrictions I had was that the duration of the animation would have to be 10 seconds and that it had to be 1920px wide.

My former teammate had already started on this obstacle last week, but since I did not have access to her files I just tried to remember what and how she had done it. And I remembered that she did the clouds in three different layers to add depth.

So with that in mind I started sketching out some clouds at random which didn’t really look good. That was when I realized that we had this really awesome concept art for it that our lead programmer drew. (He should be lead art instead)

bg_lightning_sketch

So basically I used that picture as a template and started to draw something as similar to it as possible. I could keep the shapes of the clouds pretty similar to the concept, same for the colors, but when it came to the lightning I had to make some changes.

For starters they were not allowed to hit the train. This because the player has to have a flying chance to fly under it without being hurt. So in my first sketches (which I forgot to save for this purpose) the obstacle where 600px high, when the lightning reached its peak. And that was too high. My programmers did not have a good answer as to which height it should have, so for now it is 485px.

So after drawing out the lightning’s a bit more for every frame until they peaked, I played the animation and realized that it was a bit stiff. So I made the clouds rumble a little bit and it helped. However, the programmers have fixed it so that the entire camera in the game will shake as well, to give you an even bigger feel of being in a storm.

lightning_animation

So what I have left now is to extend/adjust the animation so that it can play for 10 seconds. I will also have to render out each lightning as a separate sprite sheet so that they can have individual hitboxes.

That’s all for now!

Tornados

Hi guys!

This week I will talk about tornados. Or more precisely tornado animation.

In our game we have a power up that allows the player to summon a tornado which eliminates all the enemies and obstacles currently present on the screen.

A few weeks back I did the icon for the power up which ended up like this.

tornado_iconHowever, this was only concept art and the art style of the game has change a bit since then.

I have never animated a tornado before and quite frankly just drawing for the icon was a challenge for me. I wanted it to be flawless and realistic and that is not what we are going for in our game.


So to do this animation I started off by trying to get the core movements.

ezgif.com-crop 
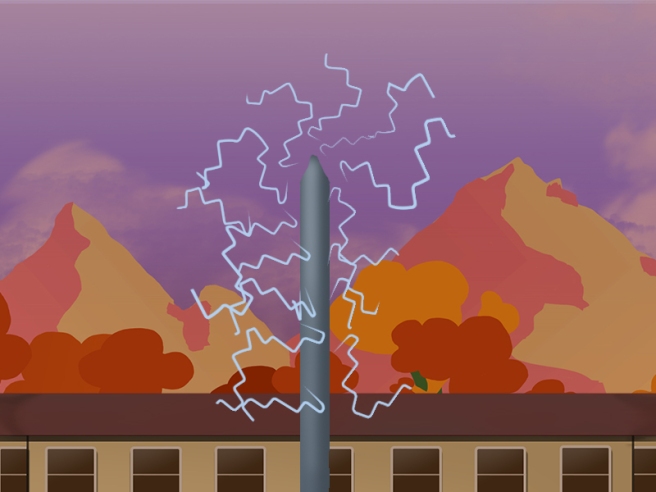
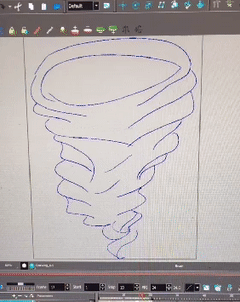
I started off with four frames. One for the start position, two in the middle and one for the end position. I did this in Toon Boom Harmony.

After doing that I continued to add more frames until I had a movement that I was sort of satisfied with. After that I tried to fill it with color and also try a semi see-through pattern.

ezgif.com-resize 
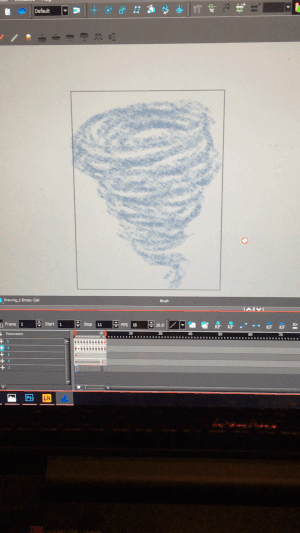
I decided that the movement was done and lifted the animation to Photoshop. The reason why I did not finish up in Harmony is that I have yet not figured out how to lift the frames with a transparent background. So right now I am wasting a lot of time making a green screen behind the drawings and then removing it in Photoshop.

So once in Photoshop I used a semitransparent brush and started off with a light blue color. I then started to make a lot of different strokes bending them to give the illusion of depth. I did this for the entire 11 frames before going back to the first frame and adding two shadow layers and one highlight. I then took that frame and added it to an in-game picture.

Screenshot_6I realized that the colors did not look good with the rest of the game and went back and made everything in different shades of purple.

Screenshot_7 
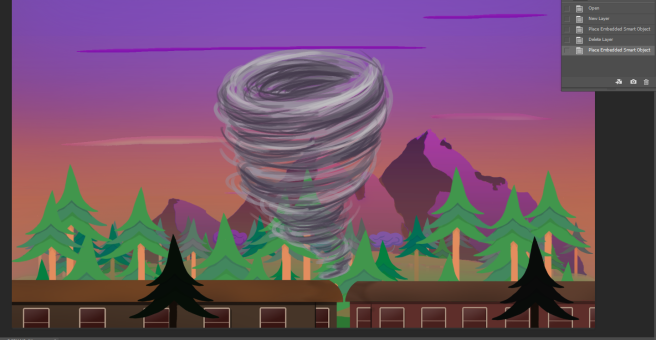
I quickly checked it with the in-game pic and decided that I was satisfied. After that I repeated the process of two layers with different shadows and one with highlights for the remaining 10 frames. After that I tested the animation and went back for some finishing touches. The entire process took me 10 hours. And here is the end result!

tornado_animation

Until next time folks!

Falcon part 2

Hi guys!

So this week I have continued to work with my enemy animations and I have also animated our power up icon animation. But in this post I will be writing about the falcon enemy type animation, which is finally (!!) done and I am halfway done with the next one.

In last week’s post I wrote about the struggles I had whilst working in Adobe Animate. I could not get the wings to bend properly and I briefly tried to learn Toon Boom Harmony 12, but gave up and continued in Animate. However, During the weekend, I gave Toon Boom another shot and actually succeeded. However, I totally underestimated the time required to do frame by frame animation from sketch to clean up to a complete animation.

During the sprint planning I estimated that it would take me two hours to finish the animation. It took me 15. Safe to say I have not slept much this week.

I ran in to a lot of different problems with this animation, apart from working in a completely new program. The first problem I encountered was the proper movement of the wings. It took me a bit of research to properly understand how wings work. There is a lot of YouTube tutorials on it, however I found that this simple picture explained it best.

accord_puppet_wing_sprites_by_aleximusprime-d61mwap

So once I had the wing movement done I did a rough sketch of the animation. After that I cleaned it up, and finally I made sure that the line art was tight.

The next problem was that I wanted the animation to be perfectly smooth. I was up in 24 individual key frames when my lead programmer told me to calm down and cut the frame count in half. So I did but instead of twelve I went for 16 frames. And realized that I could have saved up to 3 hours of work if I would have accepted that it does not have to be pitch perfect all the time.

The next step was to add color. It took me some time to decide the colors but as soon as that was done it all went rather quickly. I would really like to add some shadows. But that will have to wait until after the beta.

The final problem was that I can not seem to find any good ways to export my animations. But I am working on a solution fot that.

So even though this animation has been a never ending nightmare consuming 2 weeks of my life it is finally over and I learned a lot. Also the next two enemy animations will be a walk in the park, seeing as I now know how to and not to do a good animation. An I can also use the falcon animation as a template for the others.

So here you can se my process from start to finish.

Screenshot_2Screenshot_3Screenshot_4

output_Pf6g3R

The final animation looks better then this one but I could only extract it as an swf, which wordpress does not support. So in order to show off I had to reduce the quality by going through converters.

Falcon Animation

Hi guys!

So this week has been a really unproductive one for me. Mainly due to personal reasons but also due to some really bad planning and prioritizing. My tasks this week was to animate four different assets. Unfortunately, I have only finished one assets animation and started on another one.

In this post I will talk about the one I have started, but not finished. falcon1
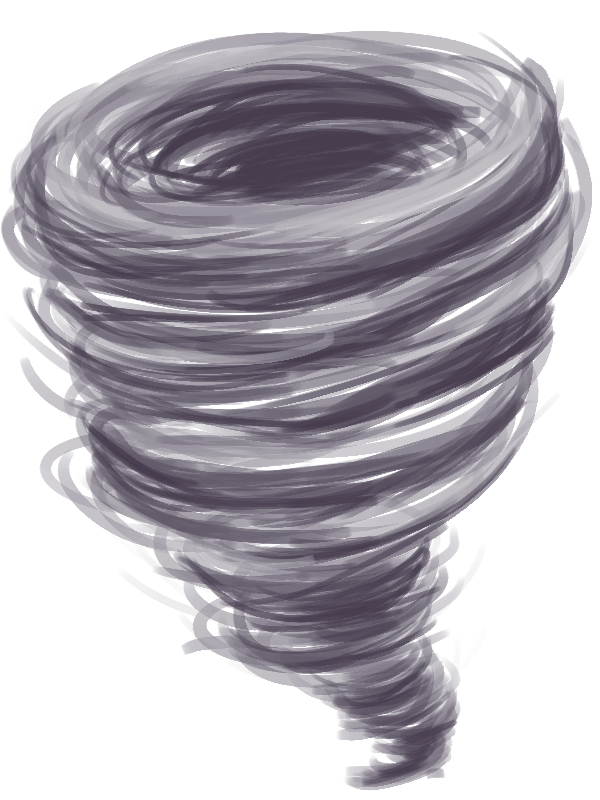
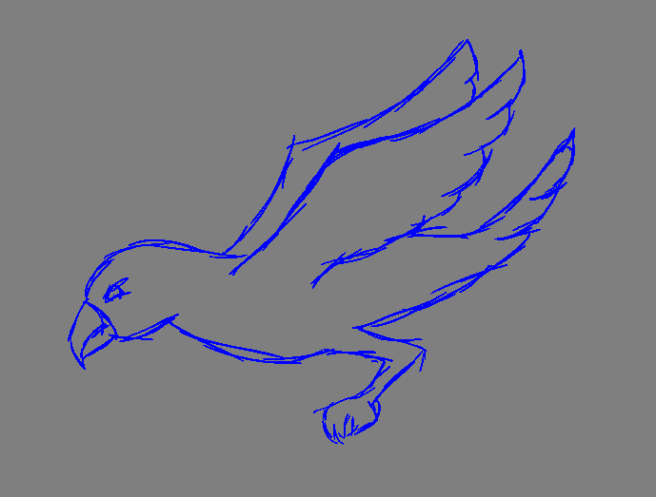
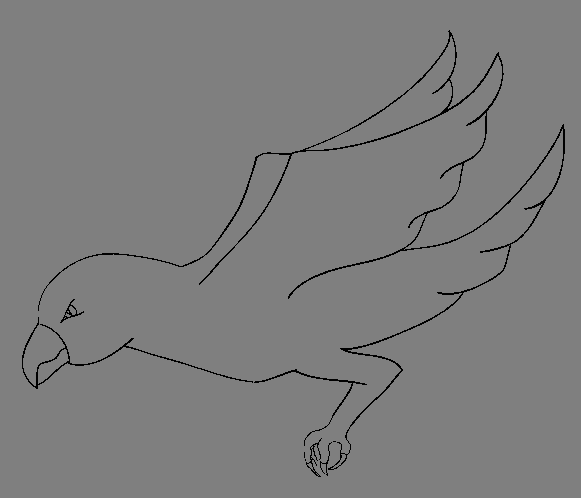
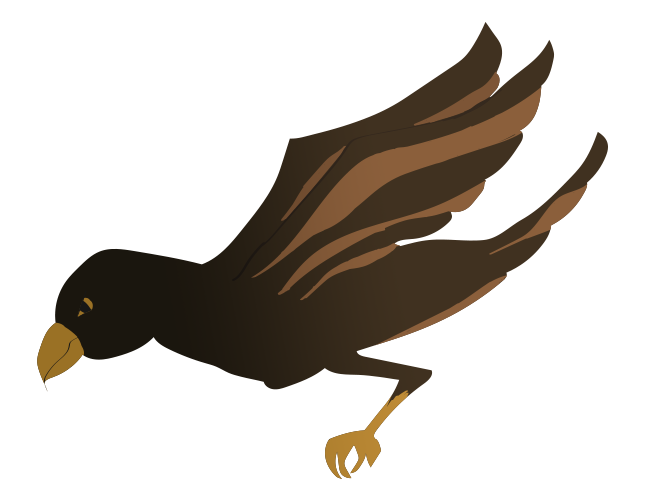
This is the falcon. The falcon is an enemy which enters the screen from the left, flies straight ahead until the player is within reach. Once the player is within reach it attacks the player by moving towards it in a 45-degree angle.

So this week I were supposed to do the idle flight animation. I went in to this task excepting roundabout eight hours of work. I have put down almost 11 hours and I am nowhere near being done. This due to the fact that I did not realize how hard it would be to animate the wings flapping.

I am animating in Adobe Animate (previously called Flash) because I have worked with that software before. I have also done an animation close to this one, but it was a long time ago and I do not remember how I did it.

So basically the entire bird is built out of five different pieces. The head, body, leg and the two wings. This to allow me to move and animate all of them separate from one another. So far so good.

But once it was time to animate the wings I started to struggle. My first naïve idea was to only have two keyframes and put a shape tween in between them. This lazy way proved to not be suitable at all. The end result from that was this:

leftwingfail

So even though I tried to make some more adjustments in the shape tween it did not work. So at this point I declared war with Adobe Animate and decided to move on in life and start using Toon Boom Harmony instead. That software is far better than Animate and 1000 times better than animating in Photoshop.

But after staying awake until 3 AM desperately trying to learn how to use it, I realized that it was taking to long.  So I went back to Animate. And I am still trying to figure out how to make it bend properly. I have a strong disliking for frame by frame animation, but I had to compromise a bit. So now I am trying to draw out 5 out of the 10 needed frames and using a shape tween in between them. I also removed some of the details to make the animation easier.

The biggest realization I have reached this week is that I need to learn Toon Boom Harmony. It seems to be such a great tool to animate with. But I do not have time to learn it and implement it in this project.

Anyways, stay tuned and come back next week to (hopefully) see my complete animation.

Electrical Wires

My name is Thea Falkenmark and I’m one of three graphic artists in group 13. Our game is the game Trowl. It’s about a magical owl mom, whom flies above a train, searching for her lost owlets.

This week I have worked on a lot of artefacts. This because we had to go into crunch mode in order to get all the concept art ready for the design document.

The one that I had the most trouble with was the electrical wire. The electrical wire is one of four obstacles in our game, Trowl. The actual finished artefact was not hard to do.

However, when I was about to start I found several flaws in the concept. The only guidelines we got from the concept document was:

“If the player gets hit by a wire he/she will stunned for a short moment, making the owl mother and the owlets vulnerable to enemy attacks”.

Seeing as our game is in 2D perspective and it takes place above an old-school train, somewhere in a forest, there were no natural way for it to appear. My first thought was that it could be a wire on top of the train that broke and fell down. But in order for that to work we would have to draw wires above the entire train and that would not look good in the environment. So then I thought that it could be an electrical pole that appears at random. It could not be placed in the background even though this would be more visually pleasing. This because it would not make sense that it would affect the owl on board the train when the obstacle was behind it. If I would have put it that way, it that way there was the risk that it would blend in to the background and the player would not realize that it was an obstacle before it was too late.

So I came to the conclusion that it had to be placed in the foreground. So now it was time to start drawing and my first thought on how it would look was something like this.

elstolpe-liten

But after consulting my teammate she basically said that that would look like something from a nuclear plant. So I moved on to basically having a plain metal pole that was electrical.

I started to think about what kind of visual feedback the player would get and figured that a halo of lightning would be the best solution. I redefined the description for the design document like this:

“The electrical wire appears at random. It covers half the screen and forces the player to fly over it. If the player gets hit by a wire he/she will stunned for a short moment, making the owl mother and the owlets vulnerable to enemy attacks. The obstacle will blink and move to the left along with the train, passing the avatar and her owlets without adding any more damage whilst they are paralyzed.”

I also decided that I wanted it to make two different noises, one whilst idle and one when the owls collides with it.

My main problem when drawing this was the lightning bolts. I realized that it was way harder than I thought to draw them. All the lightning I drew ended up looking like Harry Potter’s scar. And we did not want it to look that plain simple. After that I tried using Photoshop lightning brushes. But that made it to realistic, and we were not going for that either. After a while I remember that the Lazy Nezumi plugin for Photoshop has a setting called noise. This allowed me to make lightning bolts that ended up somewhere in between Harry Potter and hyper realistic lightning. This is the end result.

wire

I’m not very happy about the end result and I think I might go with the “nuclear plant” type of pole when I start to animate. But seeing as I had about one hour to this, where the most part was spent planning on how to do it, I figured that it was good enough. And after all it is only concept art.